Free Doll cradle plans

Materials:
For this project you can use MDF or plywood ¼ inch (6mm) or 3/8 inch (9.5mm) thick.
You will also need the following consumable items:
- Sanding block with 120 and 80 grit sandpaper.
- Duct tape.
- Thin card for making templates.
Tools:
This is a list of the basic tools that I used to complete this project. The links will take you to eBay where you can see what is available in that range and compare prices.
- A cordless power drill, the best thing since sliced bread. Not only can it drill holes, it can drive screws as well.
- A tenon saw, also known as a back saw. Useful for smaller woodworking projects.
- A combination square, a measuring tool I use all the time.
- A scroll saw, very popular, mine is an entry level type.
- A smoothing plane, another tool I use all the time.
- A sliding bevel, a type of measuring tool useful for transferring angles.
Step by step instructions.
When I am starting a new project, I find it helpful to read through the instructions first.
This is a copy of the instructions contained in the e-books for Version 1 and Version 2.
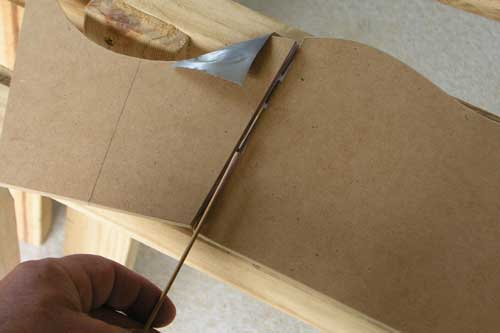
1. Make a template by pasting the profile onto a piece of thin card and cut out the shape.
2. Trace the parts onto the wood and cut out the shapes with a jigsaw and clean up the edges with the smoothing plane and wood file.
3. To cut out the heart shape, first drill a hole to fit the size of your jigsaw blade.
4. Measure the angle with the sliding bevel and plane the bottom of the two sides to this angle.
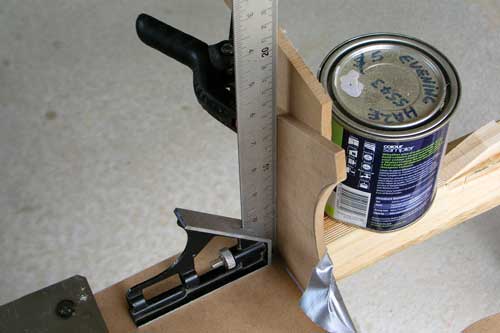
5. Using bits of leftover timber to make two right angle jigs similar to the one in the photo above.
6. Line up one end to one side and apply the duct tape. In effect, this forms a hinge. Lay the end flat and apply a thin bead of glue as shown in the photo. Be sure that the bevel is facing the right way.
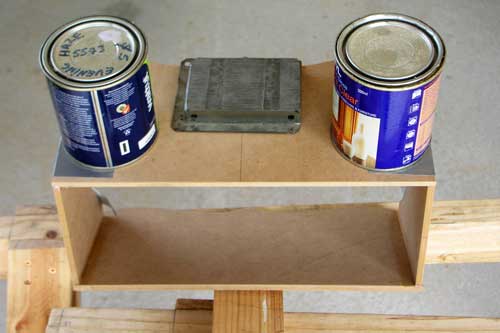
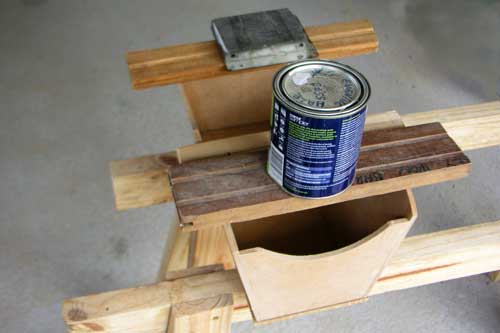
7. Fold up the end making sure the corner remains flush. Clamp the right angle jig in place and check for squareness. The photo shows the parts held in place with weights (in this case, the paint tin).
8. Do the same for the other half, making sure you have a handed pair.
9. Once the glue has set, tape and glue the two halves together. Note how a piece of timber is wedged under so that the top is about level.
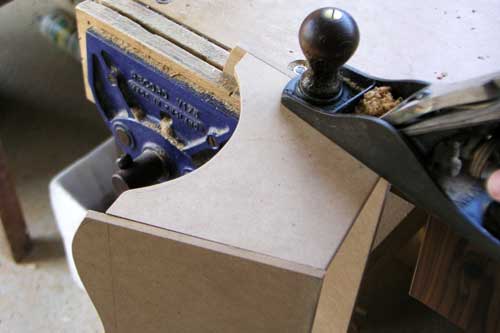
10. Once the glue has set, it may be necessary to trim the edges with the smoothing plane as shown in the photo.
11. Cut the floor slightly oversize and glue it in place as shown in the photo.
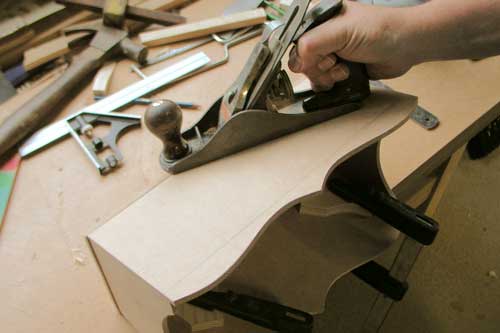
12. The workpiece is clamped securely to the bench and the floor trimmed flush. This will put the joints under stress, so it may be a good idea to leave the glue to set overnight.
13. All that remains is to glue the rocker ends and the project is complete.
Painting and finishing.
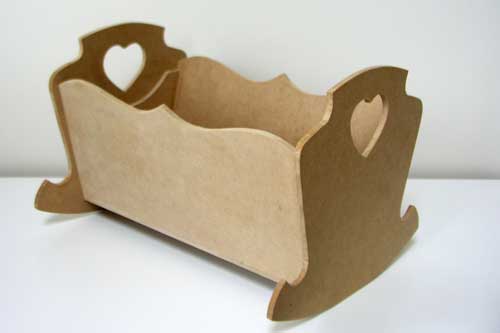
Paint or finish the project in colours of your choice.
Download free doll cradle plans
Conclusion
I hope you will enjoy making this project from these free doll cradle plans.
Why not take a few photo and send them to me, and I will gladly include them in the woodworking projects gallery page.
More Toys For Girls
|
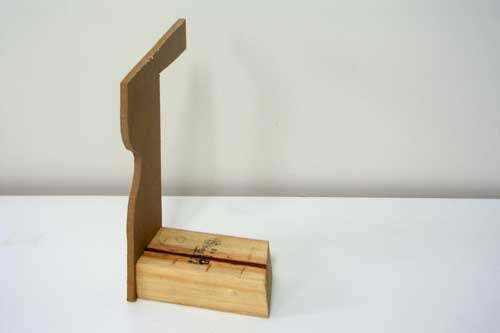
A fine example of a doll cradle made by Des Legget. Visit the Photo Gallery to see more woodworking projects. |


How to turn your hobby into a profitable business.
Solo Build It! (SBI!) is an online platform that empowers solopreneurs to build profitable online businesses. For over two decades, SBI! has been trusted by members to turn their passions, hobbies, or skills into successful ventures. Recently, the introduction of ChatGPT has ushered in a new era of AI-assisted content creation within SBI!.
Allow me to introduce you to Tai, your business-building AI assistant. Tai is now available in SBI! and can help you navigate the world of online entrepreneurship. Whether you’re a complete beginner or an experienced solopreneur, SBI! provides everything you need to create an income-generating website or blog.
Here are some reasons why starting an online business with SBI! and Tai is a great choice:
- Adaptable Lifestyle: Building an online business adapts to your desired lifestyle. Enjoy newfound freedom without being tied down to another job.
- Low Startup Costs: You don’t need significant capital to begin. All you require is a computer, internet access, a roadmap, and an affordable platform like SBI!.
- Flexibility: Work as much or as little as you want, wherever you choose. Once you’ve built a solid foundation, you can earn money even on days you don’t actively work.
- Portability: Take your business with you, especially if travel is part of your retirement dream.
- Global Impact: Help people worldwide by sharing your knowledge and expertise.
- Continuous Learning: Running an online business keeps your mind active and energized.
SBI! combines education, tools, and a proven process to give you the highest chance of achieving your financial goals. Whether you’re aiming for financial independence or simply want a rewarding project during retirement, SBI! can guide you.
If any of this resonates with you, I invite you to explore SBI! and discover how it can help you build your online retirement business. Even if you’re a beginner, SBI! provides the resources you need to succeed. Say hello to Tai and embark on your entrepreneurial journey! 🚀
Learn more and try Tai for free on the Solo Build It! website.
- Home
- Girls Toys
- Free Doll Cradle Plans
Recent Articles
-
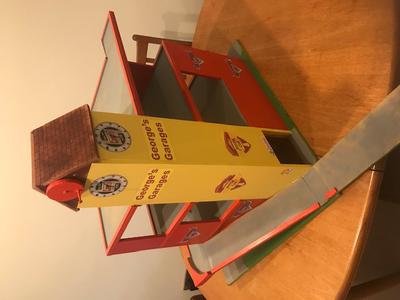
Georges Garage Parts 1 and Part2...
Apr 08, 24 03:06 AM
 Hi Tony! You asked for photos of the completed project. I tried to add but got a server error! Can you add them for me? Thanks Chris
 -
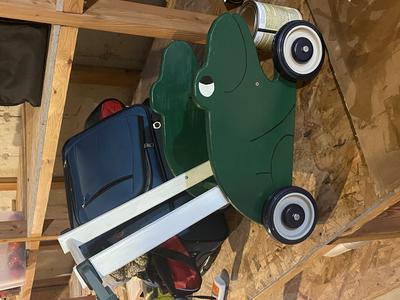
Toddler walker
Jan 29, 24 06:20 PM
Made for my daughter Lily -
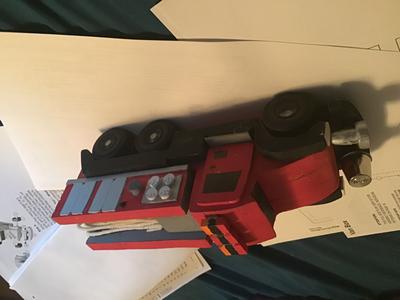
Rich S
Sep 10, 23 01:44 AM
I got the tow & box van with the dump truck plans from you. I enjoyed doing the tow truck but modified the plans to make a fire truck. I was on a local