Toy Car Plans

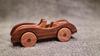
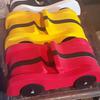
The photo shows the fastest littlest racing car driven by Big Heart Bear.
Don't let it's simple appearance fool you - there is a bit of a challenge, which relates to getting the wheels to fit neatly into the wheel arches. Use contrasting wood for the fenders, and laminate a darker piece in the middle to give it that "go faster" racing stripe.
Materials
This is what I used to make this toy car. You can use virtually any thickness of wood that will fit the templates.
Pine 19mm (3/4") thick by 100mm (4") wide x 800mm (31 1/2") long.
Optional meranti or darker wood 12mm (1/2") thick by 75mm (3") wide by 260mm (10 1/4") long.
6mm Dia. dowel 180mm long for the axles.
For the template, use thin MDF board or Masonite or plywood 260mm (10 1/4") long by 140 (5 1/2") wide.
Tools
This is a list of the tools that I used for this project. Clicking on the links will take you to eBay, where you can research the latest in woodworking tools and compare the cost.
Something to cut curves - depending on your budget, a band saw very useful for almost all woodworking project. Not quite as expensive, unless you go for the top brand, a scroll saw is very popular.
A less expensive option is a fret saw or coping saw.
For these toy car plans, I used a circle cutter for the wheel arches in the sides of the toy. It was modified to cut wheels instead of holes. Find out more on the page about making wooden toy wheels (opens a new window.)
- I would recommend using a drill press when using a circle cutter.
- A tenon saw or a hand saw.
A band saw of a scroll saw.
Step by Step Instructions Toy Car Plans
Make as many copies of the toy car plans as you need to. Trace the outline of the body shape and the mudguards onto thin MDF (Medium Density Fibreboard) or plywood or even stiff card and cut it out.
For the wheels to fit in the wheel arch, it is important that the center of the wheel arch and the hole for the axle are drilled accurately. To do this, I place the mudguard template over the body template and drill a pilot hole through both templates.
Step 1
 Step 1
A pair of nails holds the template in place. Trace the outline and turn it over to trace a mirror image for the other half. The hole left by the nails is used to ensure the accurate cutting of the wheel arches in the next step.
Step 2
 Step 2
Using my trusty drill press, I cut the holes that will form the wheel arches using the reference holes as mentioned in Step 1.
A drill press is strongly recommended when using this type of circle cutter. The leftover centers can be used to make a pair of wheels.
Step 3
 Step 3
Using a half round file to remove the burr left by the modified circle cutter.
Step 4
 Step 4
Make a template for the body and use it to cut a rough shape on as many pieces of wood that you may want to use for the body. As an example, for the body, I used two pieces of 19mm pine and a contrasting piece of 12mm meranti sandwiched in the middle.
The photo showing the parts rough cut ready to be glued together. Note the template in the foreground and for what it's worth, the mudguard with the wheel arches cut out in the background.
Step 5
Cut the mudguards to shape with the band saw, then use the 6mm roundover bit in a router (mounted in a router table) to round over the edges. If you are not comfortable using a router on such small pieces of wood, it would be much safer using a half round wood file and 80 grit sandpaper.
Note that the wheel arches are to be rounded over on one side only as the other side is to be glued to the body.
Step 6
 Step 6
Clamping the mudguard to a sawhorse, I cut it in half with a tenon saw.
Step 7
By now the glued up body parts has set enough for me to handle it. I cut out the shape with a bandsaw, then sanded the saw marks away with a combination of a half round bastard file and 80 grit sandpaper. This is where a drum sander would've come in handy.
Step 8
Round off the edges of the body with a 6mm round over bit in a router. If you are not comfortable using a router on small bits, use a half round bastard file and 80 grit sandpaper.
Step 9
I only thought about this afterwards, but you can learn from my mistake. Staining the mudguards a deeper colour or using contrasting food colouring would make the toy more attractive, so now is the time to do it before gluing the mudguards in place. My mistake was to try to stain it afterwards, and the problem is that the glue makes the stain blotchy.
Step 10
 Step 10
Hold the mudguards in place, mark and drill the holes for the axles. Now, with the wheels in place, glue the mudguards. Try not to apply too much glue at this stage. I suggest marking the areas to be glued lightly with a pencil.
Step 11
 Step 11
The photo showing the clamps in place. This also illustrates the wisdom of pre-staining mudguards before assembly, as noted in step 9.
Toy Car Plans Free Printable PDF
Here is your copy of the free printable PDF toy car plans.
Share Your Toy Car Project
Would you like to share photos of the toy car from these plans?
What Other Toy Makers Have Made
Click below to see projects from other toy makers to this page...
Toy Racing Car by Plaaties Kieken
Toy Racing Car by Plaaties Kieken
Koops Kara and Koopuzzles
Here my variations of a couple cars I seen your plans for the Batmobile and the toy car racer.
Looking for farm tractor toy plans
Hi Tony,
I'm looking for plans for a farm tractor for my grandson.
Can you please help me?
Kind regards,
DAVE (SOUTH AFRICA)
Wooden Toy Car by Ahşap Dünyası Gürün
Wooden Toy Car by Ahşap Dünyası Gürün, found on Pinterest.

Wooden Toy Racing Car by Murat Gelen
Wooden Toy Racing Car by Murat Gelen.
Toy Racing Car by Сергей
Toy Racing Car by Сергей, found on Pinterest
Batmobile Toy Car by Luiz Augusto
Batmobile Toy Car by Luiz Augusto, found on Pinterest
More Toys For Boys And Toy Car Plans
Batmobile Toy Car Plans build your home made toy. Full size templates.
Free plans to build your very own batmobile toy car out of wood. Simple design for beginners.
Wooden Toy Car Plans fun project free design
Free wooden toy car plans. Make your own wooden toy car with these free plans that include step by step instructions with diagrams and photos.
Wooden Toy Car Plans print ready PDF download woodcraft project
Wooden toy car plans free to download. Fun to make roadster ideal for beginner with limited tools. Detailed plans and building guide.


Making Wooden Toy Wheels
For this toy dump truck, I made my own wheels using a circle cutter mounted in a drill press.
It may be easier to buy ready made toy wheels.
A selection ofLumberjocks woodworking forum a place to showcase your projects, and ask any questions related to woodworking.

- Home
- Boys Toys
- Wooden Toy Car
- Toy Car Plans
- Home
- Boys Toys
- Wooden Toy Car
- Toy Car Plans
Recent Articles
-
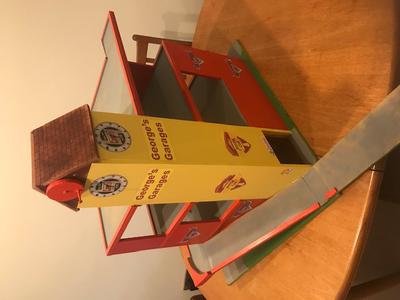
Georges Garage Parts 1 and Part2...
Apr 08, 24 03:06 AM
 Hi Tony! You asked for photos of the completed project. I tried to add but got a server error! Can you add them for me? Thanks Chris
 -
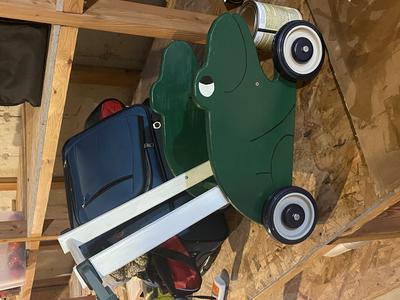
Toddler walker
Jan 29, 24 06:20 PM
Made for my daughter Lily -
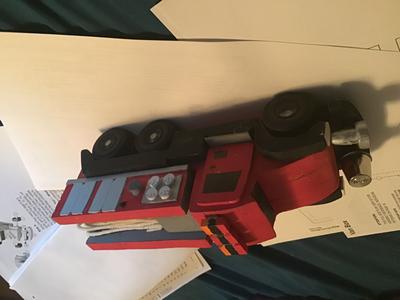
Rich S
Sep 10, 23 01:44 AM
I got the tow & box van with the dump truck plans from you. I enjoyed doing the tow truck but modified the plans to make a fire truck. I was on a local